ohg
openHAB for Garmin
openHAB for Garmin connects your Garmin wearable to your ➡️ openHAB smart home system, giving you convenient access to essential devices and real-time information.
Resources
➡️ Install on Garmin Connect IQ Store
➡️ openHAB Community Discussion
Development Status
🚧 This app is in an early stage of development. Core features are available, and active development is ongoing.
Table of Contents
- Introduction
- Configuration
- Using the App
- Settings Menu
- Troubleshooting
- License
- Icon Credits and Attributions
Introduction
This app is built on the foundation of openHAB sitemaps, which define an interactive view of your openHAB model. A sitemap allows you to specify which devices are accessible through the app and how they are organized and presented.
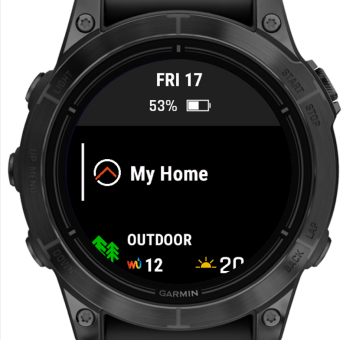
The app consists of two components: the Glance and the Widget. The Glance displays the name of the sitemap and acts as the entry point into the full-screen Widget, which shows the sitemap’s content.
 |
 |
Once opened, the Widget polls the sitemap at a configurable interval to fetch updates. Commands are sent to openHAB via its JSON-based REST API. If your openHAB setup does not support this API, you can alternatively configure a custom Webhook.
Inside the Widget, sitemap elements are displayed as Sitemap Widgets. Note: The term “widget” is used by both Garmin and openHAB to mean different things, which can be a source of confusion. In this manual, “Widget” refers to the Garmin app component, while “Sitemap Widget” refers to individual elements defined in the openHAB sitemap.
The following sections provide detailed guidance on configuring the app, supported Sitemap Widgets, user interface behavior, and troubleshooting tips.
Configuration
Once the app is installed, you can configure the following settings by opening it in the Garmin Connect IQ smartphone app.
| Setting | Description |
|---|---|
| URL | Your openHAB URL in the format https://host:port or http://host:port. Note: HTTP only works with iOS. See Connectivity and Using myopenHAB for details. |
| Sitemap Name | Name of the sitemap to display. See Sitemap Setup for details. |
| Native REST API Support | Enable if your openHAB supports the new JSON-based REST API for sending commands. See Sending Commands for details. |
| Webhook Identifier | If your openHAB version doesn’t support the JSON-based REST API (see above), you can configure a custom webhook to send commands. See Custom Webhook for details. |
| Username | For basic authentication (used for myopenHAB, see below) |
| Password | Password for basic authentication |
| Supress empty response errors | Suppress errors for empty sitemap responses. Recommended when using myopenhab.org, which occasionally returns empty results. See the related openhab-cloud issue #496 for details. |
| Polling Interval (ms) | Interval between data requests to your openHAB instance. Set to 0 to fetch new data immediately after the previous response is processed. Polling only occurs while the app is open, not in the background. If you’re using myopenhab.org, it’s recommended to use the default (3000 ms) or a higher value to avoid overloading their servers. If you’re connecting to your own openHAB server directly, you may try setting it to 0 for more responsive updates. |

Connectivity
Garmin wearables rely on your smartphone for network access. If your phone can reach your openHAB instance (e.g. via local network or VPN like Tailscale), the watch can too.
Platform-specific Limitations
- iOS: HTTP and HTTPS supported
- Android: Only HTTPS with a valid certificate is supported due to Garmin SDK limitations
You can use ➡️ myopenHAB to securely access your local openHAB instance over the Internet using HTTPS.
Using myopenHAB
To connect using ➡️ myopenHAB:
- Install the ➡️ openHAB Cloud Connector
- Register at ➡️ myopenhab.org
- Set the URL in the app to
https://home.myopenhab.org - Use your myopenHAB username and password for authentication
Sending Commands
Starting with openHAB 5, a built-in JSON-based REST API allows the app to send commands directly—no extra setup needed.
For earlier versions, you can either install the backported API (available for openHAB 4.3.x) or set up a custom webhook.
Option 1: Install the Backport
To enable JSON-based command support on openHAB 4.3.x, install the backported API bundle. Follow the instructions here:
➡️ Backport Installation Guide
Note: If you update your openHAB version after installing the backport, you may need to reinstall the backport.
Option 2: Custom Webhook
If your openHAB setup does not support the JSON-based REST API for sending commands, you can configure a custom Webhook using the Webhook binding instead.
➡️ Continue here for setup instructions.
Using the App
This section explains how to set up your openHAB sitemap for use with the app, outlines the supported Sitemap Widgets, and describes key aspects of the user interface.
Sitemap Setup
Check the openHAB Sitemaps documentation to learn more about how sitemaps work.
➡️ openHAB Sitemaps Documentation
The sitemap name configured in the app must match the filename of the sitemap, excluding the .sitemap extension.
For example, if the file is named garmin_demo.sitemap, set the sitemap name in the app settings to garmin_demo.
The label defined within the sitemap file is displayed in the app UI, such as in glances and other views.
sitemap garmin_demo label="My Home" {
}
Supported Elements
The following element types are currently supported:
The following sections describe the supported parameters and the Sitemap Widget associated with each of these elements.
Nested Elements
Nested elements are fully supported.
Certain sitemap elements — namely Frame, Text, and Group — can contain nested elements to help structure your sitemap hierarchically.
In openHAB, Frame elements are used to visually separate areas on a page, while nested elements under Text and Group are presented as navigable subpages. The Garmin app adopts a menu-based navigation structure and implements nested elements under all three types as submenus.
- For
FrameandText, nested elements must be defined manually. The only functional difference is thatTextdisplays the associated item’s state, whereasFramedoes not. Groupelements automatically populate their nested elements based on the members of the referenced group item.
For more details, refer to the ➡️ openHAB documentation on nested elements.
Frame
The ➡️ Frame element is one of three sitemap elements that support hierarchical structuring.
You can nest Frame elements within other Frame elements. While this is allowed by the specification, openHAB may log a warning when doing so — but it still functions as expected.
Technically, the specification does not permit mixing Frame elements alongside other element types at the same hierarchy level. However, in practice, this does work in openHAB. If you choose to use this unsupported approach, be aware that you’re doing so at your own risk.
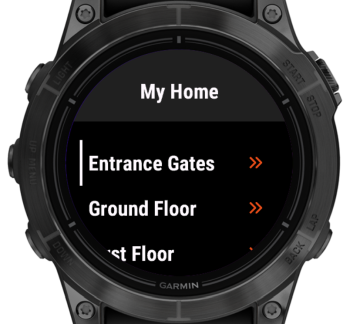
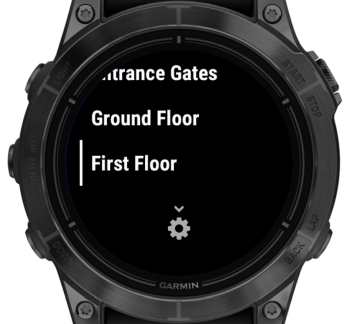
Here is an example of a sitemap containing three Frame elements.
sitemap garmin_demo label="My Home" {
	Frame label="Entrance Gates" {
		Switch item=EntranceGatesTrigger label="Open/Close" mappings=[OFF="", ON="OK"]
		Text item=EntranceGateStatus label="Status"
	}
	Frame label="Ground Floor" {
    // ...
	}
	Frame label="First Floor" {
    // ...
	}
}
This configuration produces the following display in the UI:
|
 |
Default
The ➡️ Default element displays an item using the default widget determined by its type. This widget selection is handled automatically by openHAB.
The Garmin app supports Default only if the item’s type maps to one of the app’s supported widgets. If this is not the case, an error will be shown instead.
Text
The ➡️ Text Sitemap Widget is used to display the current state of an item without allowing any user interaction.
Supported parameters:
label: the label shown in the UI.item: the name of the openHAB item whose state should be displayed.
This widget is ideal for showing read-only information, such as temperature, system status, or sensor readings. It also supports nested elements, making it suitable for creating a hierarchical sitemap structure.
Example configuration:
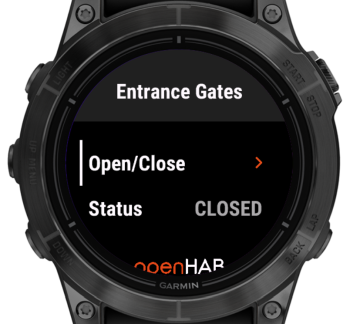
In this example, the Text Sitemap Widget is used to display the status of entrance gates. Triggering the gates is handled by a separate Switch element.
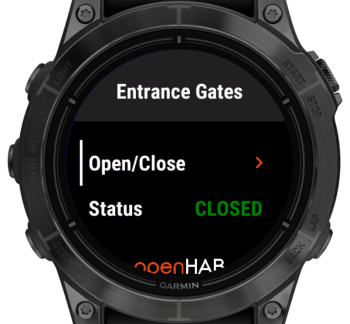
Frame label="Entrance Gates" {
  Switch item=EntranceGatesTrigger label="Open/Close" mappings=[OFF="GO", ON="DONE"]
  Text item=EntranceGateStatus label="Status"
}
Resulting UI:
|
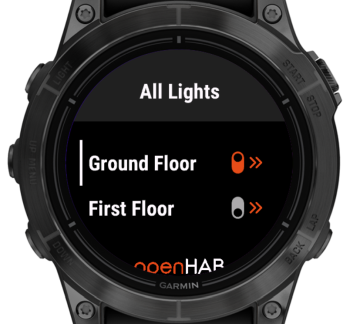
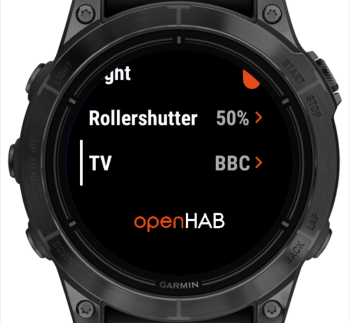
Group
The ➡️ Group Sitemap Widget will present a submenu containing all the items in the associated item of type Group. This also works recursively, if the Group item itself contains other Group items, those will again open their own submenus.
Example configuration:
In this example, the CC_House_Lights item represents a hierarchical structure: it contains groups for each floor (e.g., the first floor), which in turn contain groups for individual rooms, and those room groups include the actual light switch items.
sitemap garmin_demo label="My Home" {
	Group item=CC_House_Lights label="All Lights"
  // ...
}
Resulting UI:
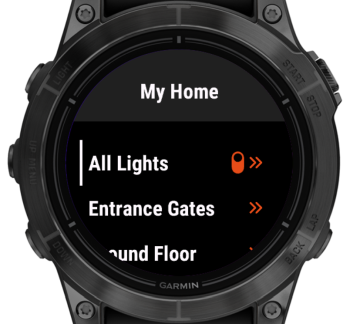 |
 |
 |
Switch and Selection
The ➡️ Switch and ➡️ Selection widgets display the current state of an item and allows the user to send commands to change it.
In other UIs, the Switch and Selection widgets behave differently:
Switchpresents all available options inline within the page.Selectionopens a dedicated selection dialog to choose a value.
However, due to the limited screen space on wearables, the Garmin app always opens a dedicated action menu whenever there are more than one or two options.
As a result, Selection is treated as a synonym for Switch, and both behave identically in the Garmin app.
Supported parameters:
label: Text displayed in the UI.item: Name of the associated openHAB item.mappings(optional): Defines command-to-label mappings for display and interaction.
The widget supports three usage variants:
- Toggle Switch – for binary items (
ON/OFF). - Rollershutter Control – a full-screen view for
Rollershutteritems withUP,DOWN, andSTOPbuttons. - Generic Switch – for items with custom or multiple commands, defined via
mappingsor item metadata.
Toggle Switch
This is the default behavior when:
- No
mappingsare provided, - The item has no command descriptions,
- The item is not of type
Rollershutter.
The switch simply toggles between ON and OFF.
Example:
Frame label="Switches" {
    Switch item=Light label="Light"
}
UI Preview:
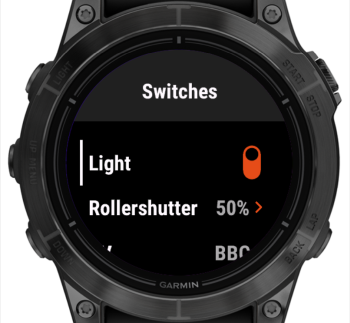 |
Rollershutter
When the item type is Rollershutter, the widget opens a full-screen control with UP, DOWN, and STOP actions.
In the menu, the item displays a textual or percentage-based state:
mappingscan be used to map numeric states (e.g.,0="Open",100="Closed"), but only affect the menu label.- The full-screen view always shows numeric percentages for clarity, since states like
0and100can reflect transitional movement (e.g., “opening”) rather than final state (“open”).
Example:
Frame label="Switches" {
    Switch item=Rollershutter label="Rollershutter" mappings=[0="Open", 100="Closed"]
}
UI Preview:
 |
 |
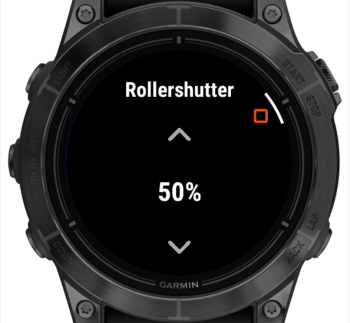 |
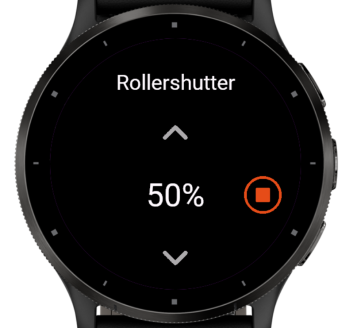 |
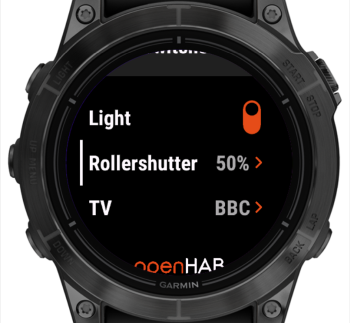
Generic Switch
This variant is used for items that don’t fall under the previous two cases.
It supports multiple custom commands, defined either via:
mappingsin the sitemap,- or command/state descriptions on the item (e.g., from a channel or metadata).
In the menu, the widget displays the current state as text:
- If the state matches one of the mapped commands, the corresponding label is shown.
- Otherwise, the raw state is displayed.
Tip: You can use an empty label in mappings if the item’s function is self-explanatory from context.
Selection behavior:
- If one command is defined, it is sent immediately when the item is selected.
- If two commands are defined and one of them matches the current state, the other is sent immediately.
- In all other cases, an action menu appears on the right side of the screen, allowing the user to select from the list of available commands. If the current state matches one of the commands, that command is not shown in the menu.
Example:
Frame label="Switches" {
    Switch item=TV label="TV" mappings=[0="ABC", 1="BBC", 2="CNN"]
}
UI Rendering:
 |
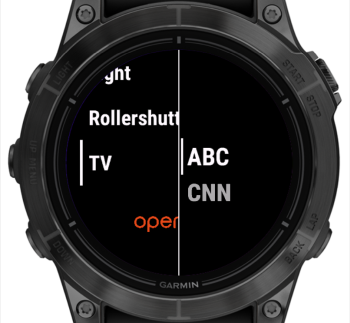 |
Note: The action menu shown in the right screenshot is a mockup. The actual appearance may vary depending on the device, as it uses a native UI component.
Example with Empty Mapping Entry
Consider a garage door opener that acts as a toggle switch: sending an ON command triggers the gate to open or close, and the switch automatically resets to OFF after one second.
This can be configured in the sitemap like so:
sitemap garmin_demo label="My Home" {
	Frame label="Entrance Gates" {
		Switch item=EntranceGates_Operation label="Open/Close" mappings=[OFF="", ON="OK"]
		Text item=EntranceGates_Status label="Status"
	}
}
In this configuration:
- The switch typically stays in the
OFFstate, where the"Open/Close"label is sufficient. - When pressed, it sends the
ONcommand, briefly displays"OK"as feedback, then returns toOFF.
Here’s how the interface appears when the switch is in the OFF state:
 |
Setpoint and Slider
The ➡️ Setpoint and ➡️ Slider widgets are numeric controls used to display and adjust the numeric state of an item.
When selected, both widgets open a full-screen view for choosing a new value, which is then sent as a command to the item.
The only behavioral difference between the two is the Slider widget’s support for the releaseOnly parameter (see below).
Supported parameters:
label: the label displayed in the UI.item: the name of the associated openHAB item.minValue: lower bound of the selectable range (default:0).maxValue: upper bound of the selectable range (default:100).step: interval between selectable values (default:1).releaseOnly: (Slider only)- With
releaseOnly: The value is only sent when the dialog is confirmed. Cancelling leaves the value unchanged. - Without
releaseOnly: Values are sent immediately as the slider is moved. Confirming keeps the current value; cancelling reverts to the value before the dialog was opened.
- With
Important note:
While the default step=1 is consistent with openHAB’s default, it often results in too many steps (e.g., 100 steps for a range of 0–100), which is impractical for wearable interfaces. Increasing step to 10 reduces the number of steps to 10, making interaction much more manageable.
Example configuration:
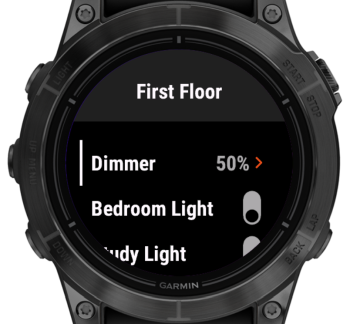
Frame label="First Floor" {
  Slider item=Dimmer label="Dimmer" minValue=0 maxValue=100 step=10
  // ...
}
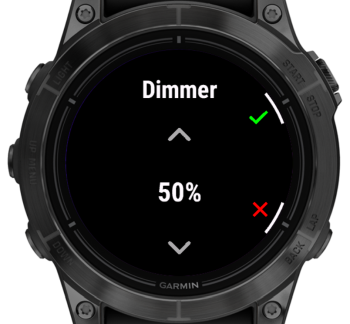
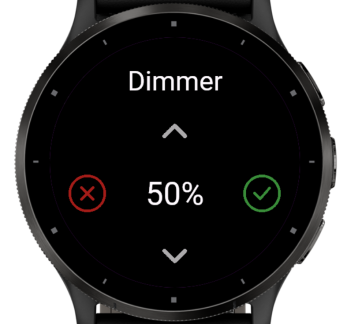
Resulting UI:
 |
|
 |
 |
- The lower-left screenshot shows the slider on a button-based device.
- The lower-right screenshot shows the slider on a touch-based device.
Note: Even button-based devices may support touch input, and on those, the UI reacts to both. On button-based devices, use up/down to scroll through the values, press enter (upper-right button) to confirm or back (lower-right button) to cancel. On touch-based devices simply tap the icons corresponding to the desired action or value to make a selection.
Dynamic Sitemaps
Of the available ➡️ Dynamic Sitemaps features, the visibility parameter as well as label and icon colors are supported.
Visibility
For usage details and examples, see the official ➡️ visibility documentation.
Here’s an improved version with clearer phrasing, smoother flow, and a slightly more polished tone, while preserving the original structure:
Label and Value Colors
For usage details and examples, refer to the official ➡️ openHAB documentation.
The app supports both labelcolor and valuecolor attributes. Color values can be specified using either hexadecimal color codes (e.g., #FF0000) or named colors (e.g., red) as listed in the documentation.
Here’s an example configuration:
sitemap garmin_demo label="My Home" {
	Frame label="Entrance Gates" {
		Switch item=Entrance_Gates_Power label="Open/Close" mappings=[OFF="", ON="DONE"]
		Text item=Entrance_Gates_Status label="Status" valuecolor=[==OPEN="red", ==CLOSED="green", ==MOVING="yellow"]
	}
}
This results in the following display:
 |
Icons
For detailed usage and examples, refer to the official ➡️ openHAB sitemap documentation.
The Garmin app supports both the icon and staticIcon parameters, using a subset of the ➡️ classic openHAB icon set. Where applicable, the app automatically selects an icon variant based on the item’s state—for example, showing different icons for a light that is ON or OFF.
Below is a screenshot illustrating this behavior: The second menu item shows a filled lightbulb icon (indicating the light is ON), and the third item shows a state-aware rollershutter icon.
Tip: Even if you don’t explicitly define icons in your sitemap, some may be applied automatically based on item metadata. To suppress this behavior, you can set the icon to an empty string in the sitemap: icon="".
Currently supported icons are:
batterylevelblindsgaragedoorhumiditylightlightbulblowbatteryradiatorrollershutterscreenslidertemperature
More icons can be added upon request. If you need support for additional icons, please post a request in the ➡️ openHAB Community Discussion.
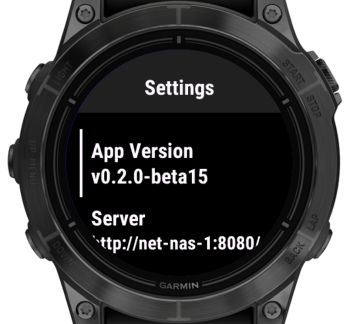
Settings Menu
To access the settings menu:
- On button-based devices, scroll down on the home screen and continue past the ⚙️ icon.
- On touch-based devices, tap the ⚙️ Settings entry in the home screen menu.
The settings menu currently displays the app version and server URL. Additional features may be added in the future when the app evolves.
 |
 |
Troubleshooting
This section explains how the app handles errors and lists common issues you might encounter.
How the App Handles Errors
The app distinguishes between temporary (non-fatal) and critical (fatal) errors:
- Non-fatal errors trigger a toast notification at the top of the screen, allowing you to continue using the app.
- Fatal errors display a full-screen error view, halting further use until the issue is resolved.
Non-fatal errors include:
- Most communication-related issues when requesting the sitemap.
- All communication-related issues when sending a command.
Note: Non-fatal errors related to requesting the sitemap will become fatal if they persist for more than 10 seconds.
Immediately fatal errors include:
-
Certain communication errors when requesting the sitemap, specifically:
- Error
-1001(see below) - HTTP error
404
- Error
- Errors encountered while parsing the sitemap.
- Any other unexpected errors or exceptions.
Note: Even after a fatal error, the app continues querying the sitemap. If a response is successfully processed, it returns to displaying the sitemap.
If “Suppress Empty Response Errors” is enabled:
When this option is enabled in the Settings, toast notifications for the following errors will be suppressed:
INVRES– Invalid response (error code-400)EMRES– Empty response
However, if these errors persist for more than 10 seconds, they will be treated as fatal, and a full-screen error view will be shown.
Communication Error Codes
To save space, communication errors shown in toast notifications follow this format:
X:NNNNNN
-
Xindicates the source of the error:S= sitemap pollingC= command sending
-
NNNNNNis the error code:- Positive values = HTTP status codes
- Negative values = Garmin SDK error codes
For a full list of Garmin SDK error codes, see the Constant Summary section here: ➡️ Garmin Communications API Docs
Special error codes:
The following error codes are used for common communication issues and those without specific error codes:
NO PHONE– The watch is not connected to the smartphone (error codes-104and-2).INVRES– The response was invalid (error code-400).EMRES– The response was empty.
Common Issues
| Error | Description |
|---|---|
C:415 |
HTTP response code 415 means Unsupported Media Type. This usually occurs when Native REST API Support is enabled in the Configuration, but your openHAB instance doesn’t support it. If you’re using the backport and have recently updated openHAB to a newer version or installed a new binding, you may need to re-install the backport to restore compatibility. |
S:EMRES |
myopenHAB currently experiences an intermittent issue (details here) where sitemap requests may return empty responses. When this happens, the app displays a non-fatal S:EMRES notification. Typically, the next request succeeds, so the issue doesn’t escalate into a fatal error. To avoid seeing these notifications, you can enable the Suppress empty response errors option in the Configuration settings. |
License
This app is distributed under the MIT License.
Copyright (c) 2025 Robert Pollai
Permission is hereby granted, free of charge, to any person obtaining a copy of this software and associated documentation files (the “Software”), to deal in the Software without restriction, including without limitation the rights to use, copy, modify, merge, publish, distribute, sublicense, and/or sell copies of the Software, and to permit persons to whom the Software is furnished to do so, subject to the following conditions:
The above copyright notice and this permission notice shall be included in all copies or substantial portions of the Software.
THE SOFTWARE IS PROVIDED “AS IS”, WITHOUT WARRANTY OF ANY KIND, EXPRESS OR IMPLIED, INCLUDING BUT NOT LIMITED TO THE WARRANTIES OF MERCHANTABILITY, FITNESS FOR A PARTICULAR PURPOSE AND NONINFRINGEMENT. IN NO EVENT SHALL THE AUTHORS OR COPYRIGHT HOLDERS BE LIABLE FOR ANY CLAIM, DAMAGES OR OTHER LIABILITY, WHETHER IN AN ACTION OF CONTRACT, TORT OR OTHERWISE, ARISING FROM, OUT OF OR IN CONNECTION WITH THE SOFTWARE OR THE USE OR OTHER DEALINGS IN THE SOFTWARE.
Icon Credits and Attributions
The in-app iconography is attributed to the following sources:

Settings by Adrien Coquet from Noun Project (CC BY 3.0)

Derived from:
Down by Adrien Coquet from Noun Project (CC BY 3.0)
Settings by Adrien Coquet from Noun Project (CC BY 3.0)

Derived from:
Chevron by Adrien Coquet from Noun Project (CC BY 3.0)

Check by Adrien Coquet from Noun Project (CC BY 3.0)

Cancel by Adrien Coquet from Noun Project (CC BY 3.0)

Derived from:
Stop by Adrien Coquet from Noun Project (CC BY 3.0)

Derived from:
Stop by Adrien Coquet from Noun Project (CC BY 3.0)